Saturday, May 31, 2008

Stinkin' Sweet Skunk Card

I was determined to use the My Way (arrow) punch and this is what I came up with.I really like the simplicity of the card and the way the red arrow pops on the black and white. And the layout is one that can be used with any of the stamps in the Fast & Fun Notes set just by changing the background.

Supplies: Fast & Fun Notes stamp set, Friend by Definition Background, Whisper White Craft Ink & cardstock, Basic Black Classic Ink & cardstock, Real Red Cardstock, white gel pen (to color in black and tail of skunk), Real Red brad

Friday, May 30, 2008

Chipboard Flower Card

There's only one more day left to order chipboard at 25% off, so I thought I'd post one more Chipboard card.
This is a 5 1/4" x 5 1/4" square card that fits perfectly in the Medium Square Envelopes. I used a Sponge Dauber to ink the chipboard flower with So Saffron Craft Ink and then embossed it with Iridescent Ice embossing powder. It's popped up with Stampin' Dimensionals. The center of the flower is a flower from Polka Dots & Petals stamped in Purely Pomegranate. I embossed So Saffron cardstock with Iridescent Ice embossing powder (first covering the cardstock with the Versamark pad). I punched it out with a 1/8" hole punch and added it to the very center to pull in the sparkly Saffron. I set the white eyelets with the Crop-a-Dile on Wild Wasabi cardstock before adhering the cardstock to the white card so that the eyelets wouldn't show through on the inside of the card.

Wednesday, May 28, 2008

Hoppy Birthday CASEd Card

I CASEd a CASE! This winter, I challenged my downline to CASE a sample from the catalog. I just loved Margo's "Unfrogettable" take on the first card on page 42 on the Spring/Summer Collection that I had to make one of my own.
I think I changed the colors a little bit from Margo's card and embossed the greeting. I used the Corner Rounder without the guard to create the scalloped edge border, but you can see my goof right under the staple. Thankfully, I won't have to mess around with the Corner Rounder much longer. Stampin' Up! announced on the cruise that there will be a new scalloped edge punch in the Fall/Winter Idea Book & Catalog that comes out in August! You can bet that new punch will be on my first order!

Tuesday, May 27, 2008

Starstruck

This card is the definition of my style -- clean and crisp.

I used the Classic Stars jumbo wheel for the background on the Brocade Blue cardstock at the bottom of the card. Then I layered the star chipboard with the large and small star punches. (Note the white rub-on that fits perfectly in the small star punch.) Other supplies include silver brads and Sage Shadow and Barely Banana cardstock (a great color combination with the Brocade Blue that I got from the Color Coach).

Monday, May 26, 2008

It started with just one kiss

I saw a Maternity t-shirt at the store the other day that said, "It started with just one kiss". Ironically, so did this baby card!

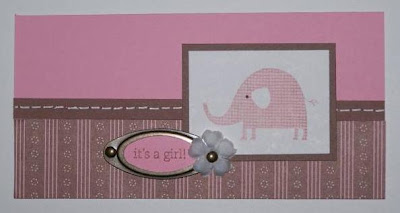
The "kissing" technique is easy and a great way to add some texture to your projects. For this card, I started by inking the elephant from Nursery Necessities with Pretty in Pink and the Canvas background stamp with Close to Cocoa. Then, I "kissed" the stamps together by stamping the elephant on the Canvas stamp to transfer the Canvas print in Close to Cocoa to the pink elephant. Then I stamped the elephant on Whisper White cardstock.

I did some faux stitching on the Close to Cocoa cardstock strip to pick up the design of the Berry Bliss paper. To get the look of sewing without the sewing machine, use your piercing tool and template (from the Crafter's Tool Kit or Mat Pack) and pierce a line of holes. Then, use the White Gel Pen (or any color Stampin' Write marker) to add dashes between the holes to mimic stitching. Great creative with your dashes and come up with different faux stitches!

By the way, this card is not a sign of the gender of baby #3....that I know of. My ultrasound in scheduled for Thursday, but we've decided to be surprised with this baby!

Saturday, May 24, 2008

Spring Into Stamping Projects, Part 2

Here are the last two projects from the Spring Into Stamping meeting last weekend:

The wall hanging uses the Small Book Cover from the On Board Chipboard collection. I used the Crop-a-Dile to add two jumbo eyelets and finished it off with Wild Wasabi ribbon. The picture is of Jim and me in Bermuda last month.

The finished size of the matchbook style card is 4 1/4" x 4 1/4". I used the 1 3/8" Circle Punch to cut out the large flower from Enjoy Every Moment. I really like how it cuts off the edges and makes it look like a totally different flower.

Friday, May 23, 2008

Spring Into Stamping Projects, Part 1

I recently designed make and take projects for our Spring Into Stamping meeting for demonstrators in our group. All four projects used the Enjoy Every Moment stamp set and the same supplies: East Coast Prep Designers Series Paper and the coordinating ink pads and cardstock (Tempting Turquoise, Real Red, More Mustard, and Wild Wasabi). Here are the first two:

The 12" x 12" scrapbook page started out as 8 1/2" x 8 1/2", but then I mounted it on 12" x 12" Real Red. I really like the "white space" around the edges and decided to leave it like that. I can't find my Basic Black marker, so I still haven't added the journaling. The pictures are from our free cruise to Bermuda last month (Thanks Stampin' Up!).

The card is the standard 5 1/2" x 4 1/4" size. The More Mustard flap is 8 1/2" x 2 3/4" folded in half around the card. To open the card, you open the flap to the right and then the card front to the left.

I used the matching Daisy Dash wheel in Real Red for then background of the card and the lower right square of the scrapbook page. I also used a Build-a-Brad on both projects. They are so easy to use and add a pop to any project. Stamp your image, punch with the 1/2" circle punch, adhere to the top of the brad, and add the clear bubble on top. Easy Peasy Lemon Squeezy!

Thursday, May 22, 2008

Quick Graduation Card

'Tis the season for graduations! Here's a quick graduation card using the Year after Year stamp set and some of the In Colors -- Soft Sky and Blue Bayou. The background of the card is Kraft cardstock. This simple layout could be used for any occasion by substituting the image and colors.

Wednesday, May 21, 2008

Cute as a Ladybug

This is one of my favorite scrapbook pages I have made. I created it as part of my submission to be display stamper for Leadership Conference last fall and I got picked! Of course this also means that I sent away the page and don't have a sample of my own.


Claire was such a cutie pie in her ladybug dress, I just had to use these pictures for a page. I started by choosing colors from her dress: Pixie Pink and Gable Green. I embossed the title in white using the Big Deal alphabet set. Originally, I had stamped "cute as a" right on the pink, but it was crooked, so I had to cover it up. I actually like the way it turned out with the Word Window punch better. The little ladybug on the b (and the cute sentiment) comes from the Bugs and Kisses stamp set. I dyed the flowers from the Pretties Kit using reinker and the Aquapainter.

The journaling says: "Grandma made this ladybug dress for Claire. I let Claire help me open the package as soon and it arrived and she couldn't wait to try it on! August 10, 2007".

Thursday, May 15, 2008

Faux Silk Card

This technique is great because it doesn't require any fancy accessories. The finished result gives this card an elegant texture.
Supplies: Full of Life stamp set, Embrace Life stamp set, Ginger Blossom Designer Series Paper, Pewter Hodge Podge Hardware, Groovy Guava Stitched Ribbon, Groovy Guava Classic Ink & cardstock, Basic Black Classic Ink & cardstock, Whisper White cardstock, Glue Stick, Tissue Paper

Directions:
  1. Stamp leaves from Embrace Life in Groovy Guava on a piece of tissue paper (yes, the kind you use in gift bags!). Stamp the greeting from Full of Life over the leaves. Allow to dry.
    Crumple up the tissue paper. Smooth out and set aside.
  2. Cover a piece of white cardstock completely with glue stick.
  3. Spread the tissue paper over the glue-covered cardstock, leaving some wrinkles.
  4. Trim the excess tissue paper that goes over the edge of the cardstock.
  5. Layer and embellish the card as desired.

TIP: For a different look with this technique, try watercoloring the image on the tissue paper before crumpling the tissue paper.